Avoid Mistakes: 7 Steps Before Your IoT Prototype Begins

Introduction to IoT Prototype Development
Are you planning to build an IoT prototype but unsure where to start? Many innovators face delays, costly errors, or prototypes that fail to perform as expected. Preparing effectively before prototyping ensures your IoT product is functional, reliable, and market-ready.
Why is it important?
The importance of planning your IoT prototype lies in its ability to turn your idea into a tangible product that works, solves real problems, and provides value to users. Effective preparation reduces mistakes, saves costs, and speeds up development.
Investing in Smart Planning
Investing time and effort in planning before creating an IoT prototype isn’t just about avoiding errors — it’s about building a product that performs reliably, connects seamlessly with users, and achieves market success. Thoughtful planning strengthens the product’s chances of success and positions it ahead of competitors.
By focusing on strategic preparation, you ensure your IoT prototype is well-aligned with user needs and industry standards.
The Stages of IoT Prototype Development
1. Define Your Product Goals: From Idea to Clear Objectives
The journey begins with defining clear goals for your IoT prototype. This stage determines the functionality, purpose, and scope of your device.
During this phase, you need to:
Identify user needs and expectations.
Set realistic technical and business objectives.
Define key features and performance metrics.
A successful goal-setting process includes brainstorming sessions, evaluating feasibility, and aligning the concept with market demand.
Example: For a wearable health tracker:
Decide on features like heart rate monitoring or step tracking.
Define battery life, connectivity, and comfort considerations.
Understand user scenarios for everyday usage.
Clear goals ensure your IoT prototype is both practical and market-relevant.
2. Validate the Market: Competitive Research and Analysis
Validating the market ensures your IoT prototype addresses real problems and stands out from competitors.
At this stage, you should:
Analyze competitor devices and identify gaps in the market.
Use tools like SWOT, PESTEL, and trend reports to understand opportunities.
Evaluate pricing, features, and user experience of existing solutions.
Market validation helps you refine your concept, allocate budget effectively, and increase the likelihood of commercial success.
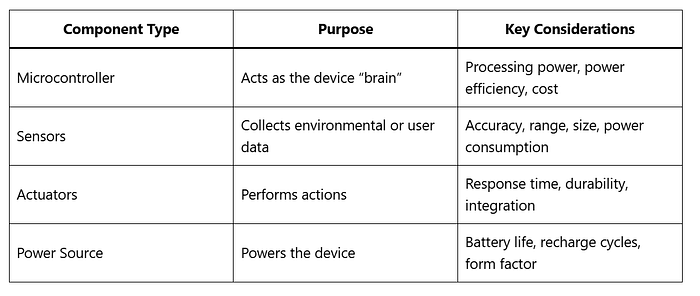
3. Plan Your Hardware and Component Selection
Selecting the right components is critical.
Press enter or click to view image in full size
4. Sketch and Design System Architecture
Mapping your IoT system architecture prevents integration issues and clarifies how all components interact.
Key steps:
Draw block diagrams for data flow, connectivity, and processing.
Define interactions with firmware, cloud platforms, and mobile apps.
Identify potential bottlenecks early.
Example: Smart home thermostat:
Sensors monitor temperature and humidity.
Microcontroller processes data and controls the HVAC system.
Connectivity module communicates with a mobile app for remote control.
5. Build Virtual Prototypes
Creating a digital prototype allows early testing without physical hardware.
Benefits:
Identify component conflicts, signal issues, or power inefficiencies.
Optimize design before costly physical prototypes.
Enable collaborative design and feedback cycles.
Tools: SolidWorks, Autodesk Fusion 360, Altium Designer.
Virtual prototyping reduces errors, saves time, and ensures a smoother transition to physical prototypes.
6. Test Feasibility and Assess Risks
Feasibility and risk assessment ensures your IoT prototype works as intended in real-world conditions.
Key actions:
Functional simulation of circuits and firmware.
Stress testing for environmental tolerance and performance limits.
Compliance checks with industry standards and regulations.
Early risk assessment minimizes costly revisions and ensures reliability.
7. Plan Manufacturing and Scalability
Even during prototyping, planning for production helps in scaling efficiently.
Focus areas:
Material selection: plastic, metal, or composite for durability.
Production volume: pilot runs before large-scale manufacturing.
Quality control: maintain consistent performance across units.
Lead time and cost: plan sourcing and assembly efficiently.
Example: Smart wearable:
Use 3D printing for casing prototypes.
Pilot PCB assembly with local suppliers.
Prepare mass production using injection molding and automated assembly.
Conclusion
Preparing your IoT prototype properly saves time, reduces errors, and improves product performance. By defining goals, validating the market, selecting components carefully, planning architecture, building virtual prototypes, testing feasibility, and considering scalability, you ensure your IoT product is ready for development and market success.
Following these 7 steps equips you with a practical, efficient, and reliable approach to IoT prototype development, increasing your chances of building a product that truly meets user needs.